Make your own Mala in 6 Easy Steps
by Jenn Bodnar | November 18, 2016 3:44 pm
If you’re wondering what a Mala is, this article may not be of much use to you. But stay with me for just a few more seconds.
Mala is the sanskrit word for garland. Similar to the Hawaiian tradition, garlands were worn by ancient Hawaiians to beautify themselves and distinguish themselves from others. The Rosary (or “garland of roses”) is a form of prayer used especially in the Catholic Church named for the string of prayer beads used to count the component prayers. Malas have been used for centuries to help people set intentions, meditate and tap into what they truly want in life.
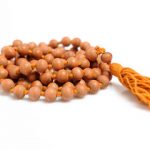
The mala consists of 108 beads. Why 108? This is a powerful number in yoga and astrology. On seasonal equinoxes the practice of 108 Sun Saluations is common in yoga communities to shed the old and welcome the new. It is said that there are 108 energy lines that make up the heart chakra. The diameter of the sun is 108 times the diameter of the earth.
If creating a simple, personalized and meaningful tool to manifest, purify and connect to your truest self sounds like something you could use read on!
1. Find Meaning.

Think about what you are needing most in your life at this moment. How will you use your mala and what would you like to cultivate. For instance Amethyst promotes stress relief, Jade soothes the heart and brings abundance into your life and Amber encourages well-being and healing. You can find more information on gemstone meanings
2. Purchase Your Supplies.

Choose with intention! You can search near and far. Your local craft store will likely carry all of your needs. You may want to find more precious stones depending on how much you want to spend. Of course there is always the world wide web. I came across while researching for this article.

The most basic needs are:
- 108 beads (recommended size: 6mm-8mm)
- 1 guru bead (this bead lies outside the circle of 108, above the tassel)
- 3 counter/marker beads (optional – these are not included in the 108; these beads are often slightly larger or different in surface texture or shape)
- String/cord (recommended thickness: 0.7mm-1mm)
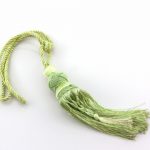
- Tassel – pick a meaningful color!
- tiny spacer beads (optional)
- Super glue like Krazy GlueG
- Glue for knot (fabric cement is recommended, to allow for flexibility)
- Scissors or cutters
3. Make Your Cord.
Gather about 110 inches of cord. Cut the ends of cord on an angle. Use Crazy Glue to make both ends pointy and sharp. You can roll between your fingers but be careful not to glue your fingers together!
4. Tassel and Guru Bead.

Loop your cord through your tassel, making sure both sides of cord are equal in length. String BOTH ends of the cord through the guru bead. Slide guru bead down toward tassel. Optional: Add a tiny spacer bead on each cord and slide to the top of Guru bead.
5. Add Your Beads One Side At A Time.

Read this section entirely before proceeding. Take your time and allow it to be a sacred, therapeutic and restorative process. Each side of your cord will have 54 mala beads, plus optional counter beads if you have chosen to add them. Make a knot on top of every bead as you add them. Slide the knot as close as possible to the bead. Repeat this process: add a bead, tie a knot, add a bead, knot. Start and complete one entire side of mala: add 18 beads and 18 knots then add one counter bead and one knot. Continue with 36 more beads and 36 knots, which will put you exactly at ½ of the mala. Add one counter bead and a knot (this is the center counter bead and will be at the base of the neck). You have completed ½ of the mala. Start the other side of mala: add 18 beads and 18 knots and then add one counter bead and one knot. Continue with 34 beads (yes 34 beads … wait for it) and 34 knots. Now you will have two beads left. Last step is the final knot. (Insert 54 beads on each side, plus optional counter bead collage.)
6. Final Knot.

Add one bead on EACH cord end. Knot between these two beads. Repeat the knot one more time so it’s secure. Add a dab of fabric cement glue to the knot on all sides. Snip excess cord.
Rejoice in your accomplishment. Perhaps you may want to set an initial intention that you can always come back to. Enjoy your creation with acceptance, love and contentment!
Source URL: https://yogadigest.com/make-mala-6-easy-steps/